Microsoft Cognitive Services (formerly Project Oxford) are a set of APIs, SDKs and services available to developers to make their applications more intelligent, engaging and discoverable. Microsoft Cognitive Services expands on Microsoft’s evolving portfolio of machine learning APIs and enables developers to easily add intelligent features – such as emotion and video detection; facial, speech and vision recognition; and speech and language understanding – into their applications.
This blog gives you a quick peek at the part of detecting language and analyze sentiment in combination with the SharePoint Framework (SPFx), C# Azure Function and the Azure Cognitive Service: Text Analysis.
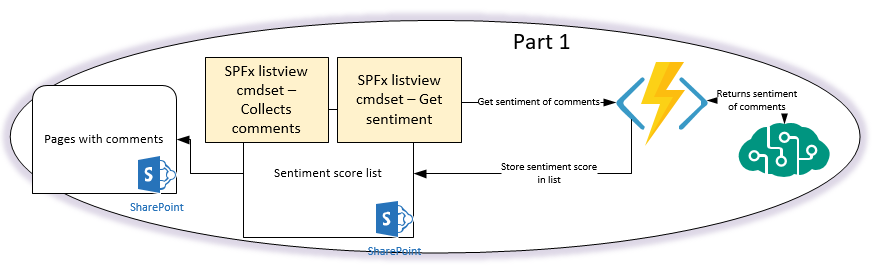
For demo purposes I’m going to analyze the sentiment of the comments given on a page in a SharePoint site and store the results in a list.
Comments
After publishing a Site Page or News Item the comments functionality becomes available.
Comments are stored in a separate data store with references to list guids and item ids. This means when moving or copying a page the comments are lost.
Using comments only a single level of replies is allowed.

Figure 1 – One level of replies is allowed
To get the comments of a page in SharePoint a REST API can be used.
Top level comments can be collected by using the list title or guid and the id of the page item, like _api/web/lists/GetByTitle(‘Site%20Pages’)/GetItemById(1)/Comments
To also get the replies for each comment
_api/web/lists/GetByTitle(‘Site%20Pages’)/GetItemById(1)/Comments?$expand=replies
For the purpose of this post a list is created where the library name and the page id can be stored. At this list listview commandset ‘Get comments’ is available to get the comments when an item is selected.
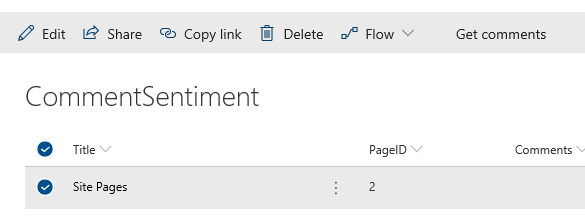
Figure 2 – List to store the info
The code of the listview command set gets the library name and pageid from the selected item.
let selectedPageItem: IPageItem = {
library: event.selectedRows[0].getValueByName("Title"),
pageId: event.selectedRows[0].getValueByName("PageID")
};
With this object the REST API is called
private async getComments(itemToGetComments: IPageItem): Promise<string> {
const currentWebUrl: string = this.context.pageContext.web.serverRelativeUrl;
let commentsUrl: string = `${currentWebUrl}/_api/web/lists/GetByTitle('${itemToGetComments.library}')/GetItemById(${itemToGetComments.pageId})/Comments`;

const response:HttpClientResponse = await this.context.spHttpClient.get(commentsUrl, SPHttpClient.configurations.v1);

const responseJSON = await response.json();
const comments: IComment[] = responseJSON.value;
let commentsInfo:string[] = comments.map((comment) => {
console.log(comment.text);
console.log(comment.replyCount);
return(
comment.text
)
})
return commentsInfo.join(" | ");

}
And the item in the list is updated with the result
this.getComments(selectedPageItem).then((comments: string) => {
//update list item with comments
console.log(comments);      sp.web.getList(this.context.pageContext.list.serverRelativeUrl).items.getById(event.selectedRows[0].getValueByName("ID")).update({
'Comments':comments
});
}).catch((exception) => {
console.log(`Oeps... ${exception.message}`);
});
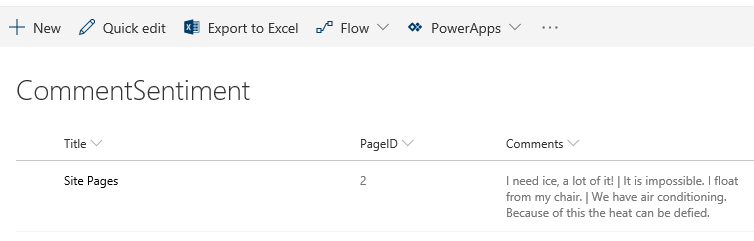
Figure 3 – The comments are stored in the list
Once the comments are available it’s time to get the sentiment out of them.
Sentiment
The comments will be used to determine positive or negative sentiment about the page the comment were given at.
To use the Text Analysis API to make sentiment(al 🙂 ) calls a Cognitive Service has to be created in Azure. This has been explained in great detail in this article: https://docs.microsoft.com/en-us/azure/cognitive-services/cognitive-services-apis-create-account
To be able to make a call the endpoint is needed and a key.
The endpoint of the API is dependent of the location selected when the service was created, in my case West Europe.
A key is needed to add to the request header ‘Ocp-Apim-Subscription-Key’, it is the subscription key which provides access to the API.
Now it’s time to start Visual Studio and create an Azure function (or create an Azure function through the Azure portal).
The next step is to add the Cognitive Services SDK to the project: NuGet package ‘Microsoft.Azure.CognitiveServices.Language’. The package is still in preview when writing this post, so select ‘include prerelease’ using the NuGet Packages Manager.
The HTTP endpoint could be called directly but the SDK make it much easier to call the service.
ITextAnalyticsAPI client = new TextAnalyticsAPI(new ApiKeyServiceClientCredentials());
client.AzureRegion = AzureRegions.Westeurope;
In the code shown above a new instance of the Text Analytics API is initialized and the appropriate region is set. This has to be the same region when the Cognitive Service was created.
The ApiKeyServiceClientCredentials class is a container for the subscription credentials and adds the ‘Ocp-Apim-Subscription-Key’ request header with the key as value to the request.
To determine the language of the comments the Language Recognition API is used.
LanguageBatchResult languageResult = await client.DetectLanguageAsync(
new BatchInput(new List<Input>()
{
new Input(sentimentRequest.Id, sentimentRequest.Text)
})
);
var detectedLanguage = languageResult.Documents[0].DetectedLanguages[0];
The comments of a single page are stored together in the SharePoint list and offered as one text to analyze. Hereby I made the assumption that all comments on a single page will be in the same language, while separate pages can differ in language.
The detected language is used as input in the Text Analytics API along with the Id and Text of the request. These are properties of the MultiLanguageBatchInput object.
SentimentBatchResult sentimentResult = await client.SentimentAsync(
new MultiLanguageBatchInput(
new List<MultiLanguageInput>()
{
new MultiLanguageInput(detectedLanguage.Iso6391Name,
sentimentRequest.Id, sentimentRequest.Text)
}
)
);
The Azure function returns the score to the requester:
return req.CreateResponse(HttpStatusCode.OK, sentimentResult.Documents[0].Score);
Update the list item
The function to get the sentiment is now in place.
The next step is to call this function from another listview commandset to get the sentiment with the comments of a page as input.
Get the input
let selectedItem: ISentimentItem = {
Id: event.selectedRows[0].getValueByName("ID"),
Text: event.selectedRows[0].getValueByName("Comments")
};
The function to get the score
private async getSentiment(itemToAnalyze: ISentimentItem): Promise<number> {
let itemToAnalyzeJSON = JSON.stringify(itemToAnalyze);

const requestHeaders: Headers = new Headers();
requestHeaders.append("Content-type", "application/json");
requestHeaders.append("Accept", "application/json");
//requestHeaders.append("Ocp-Apim-Subscription-Key", "we do not want this key here in script for everyone to read!");
const postOptions: IHttpClientOptions = {
headers: requestHeaders,
body: itemToAnalyzeJSON
};

const afResponse: HttpClientResponse = await this.context.httpClient.post(this._functionUrl, HttpClient.configurations.v1, postOptions);
const score = await afResponse.json();

return score;
}
Call the function and update the list item
this.getSentiment(selectedItem).then((score: number) => {
//update list item with sentiment score
console.log(score);
console.log(this.context.pageContext.list.serverRelativeUrl);
sp.web.getList(this.context.pageContext.list.serverRelativeUrl).items.getById(event.selectedRows[0].getValueByName("ID")).update({
'RawSentiment':score
});
}).catch((exception) => {
console.log(`Oeps... ${exception.message}`);
});
Putting it all together
To tie everything together in debug mode fire up the Azure function in Visual Studio by pressing F5.

Figure 4 – The debugger of the Azure Function is listening
Run ‘gulp serve’ from the listview commandset project, wait for the browser to come up and select ‘Load debug scripts’.
In the list one item is configured as shown in figure 3 with library name ‘Site Pages’ and PageID 2.
‘Get comments’ was already pressed to get the comments of this page.
Press ‘Get Sentiment’ to get the sentiment of the comments.
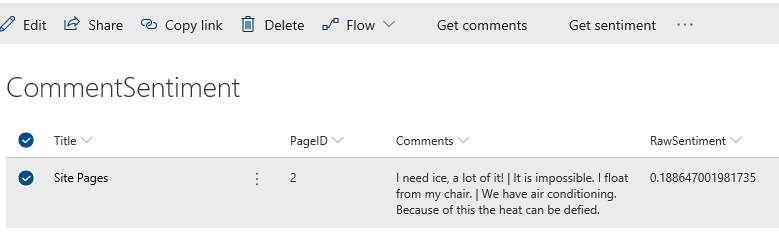
Figure 5 – The sentiment shown
The raw score doesn’t look very attractive, so some column formatting will spice things up!
Summary
The new Cognitive services can be used to analyze all kinds of data in your organization. This post showed how to analyze the sentiment of comments on a page.
This post is for demo purposes, so different steps are used here to explain the techniques, which could be combined in a production environment.
Pingback: Webhook – Sentiment of comments given on a SharePoint page – Part 2 – IT-Idea
Pingback: Notification – Azure SignalR – Sentiment of comments given on a SharePoint page – Part 3 – IT-Idea