Sometimes you need a nice clean development environment. And you need it now!
With a Microsoft Azure subscription you can easily create a new virtual machine and set it up with SharePoint 2013, SQL Server and Visual Studio.
This post describes the steps to create a basic SharePoint 2013 environment.
Create the Virtual Machine
Log into your Azure account at https://manage.windowsazure.com
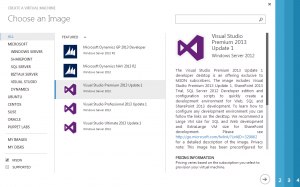
Create a new VM from gallery.
Here you can check the MSDN checkbox, but only if you’re logged into Azure with the account that is associated with an MSDN subscription, otherwise it will be disabled. This check box filters the list of VM’s to VM’s specific to MSDN subscribers.
In theory this list could be filtered to show only the Visual Studio VM’s you have a MSDN subscription for, but it doesn’t. Make sure you choose the right Visual Studio edition otherwise you end up with an expired trial version of Visual Studio in your VM for which you don’t have a product key.
When selecting one of the Visual Studio editions there will be a text at the right to explain what you’ll get:
The Visual Studio Premium 2013 Update 1 developer desktop is an offering exclusive to MSDN subscribers. The image includes Visual Studio Premium 2013 Update 1, SharePoint 2013 Trial, SQL Server 2012 Developer edition and configuration scripts to quickly create a development environment for Web, SQL and SharePoint 2013 development. To learn how to configure any development environment you can follow the links on the desktop. We recommend a Large VM size for SQL and Web development and ExtraLarge VM size for SharePoint development. Please see http://go.microsoft.com/fwlink/?LinkID=329862 for a detailed description of the image. Privacy note: This image has been preconfigured for Windows Azure, including enabling the Visual Studio Experience Improvement Program for Visual Studio, which can be disabled.
I selected Visual Studio Premium.
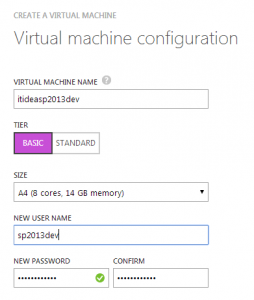
At the next screen a few fields have to be filled in:
- Virtual machine name – enter a name of your choice
- Tier – this setting can save you some money, I’ll explain it later
- Size – choose a size of the VM
- Username – willl be needed to login by RDP
- Password – will be neededto login by RDP
Tier and size need some additional explanantion.
Tier
You can choose between Basic and Standard tier. Both have similar configurations in size, but the Standard tier does include load-balancer and auto-scaling. For development purposes this is probably not a requirement and Basic tier is an excellent choice.
A Basic tier ExtraLarge Windows VM costs at the time of writing € 0,447/hr, the same configuration in Standard tier costs € 0,537/hr. By choosing the Basic tier you will save about 20% on your VM costs.
You are able to switch the tier after creating the VM if you change your mind about it.
Size
Microsoft recommends an ExtraLarge VM size for SharePoint development, but the choices in the list all start with ‘A’ followed by an number.
The mapping:
- A0 – extra small
- A1 – small
- A2 – medium
- A3 – large
- A4 – extra large: 8 CPU cores, 14 GB of memory
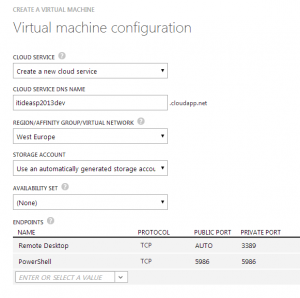
After filling in the field select the arrow and the next step of the configuration will appear. Here I change the region to West Europe and kept the defaults for the other fields.
The last VM configuration screen allows you to install the VM agent and some extensions.
The VM Agent is used to install and manage extensions that help you interact with the virtual machine. For example, when you can’t access the guest OS because of a forgotten password, an extension can help you change the password.
So I recommend to install the VM Agent.
After selecting the ‘check-mark’ button the VM and the cloud service will be created and started. In my case it took about 5 minutes to complete.
Once completed, you can select ‘Connect’ at the bottom of the screen and the .rdp file will be downloaded to your machine. Or you can start the RDP client and use the DNS name with the Remote Desktop public port to connect to the VM. Use the username and password when configuring the VM to login.
Create the SharePoint environment
Once you’re in the VM you’ll find a folder ‘ConfigureDeveloperDesktop’ on the desktop. In here a Scripts folder is located with 3 PowerShell scripts.
ConfigureSharePointFarm
- Provisions SQL server
- SP2013_Configuration database
- Central Administration
- Web application
- Root site collection
ConfigureSharePointFarmInDomain
- All of the above
- Assumes you have a VM as domain controller in the same virtual network as the Visual Studio VM
ConfigureSQLServer
- Provisions SQL Server
The easiest option is the first one, ConfigureSharePointFarm. It takes farm account and password as parameters and off you go. The account doesn’t has to exist, the script will create it for you in that case.
After about 50 minutes the script completes and a SharePoint development environment, including Visual Studio, is up and running.
SharePoint is installed as a trial, so it’s probably a good idea to use your product key to fix this.
Visual Studio is installed without a license, this can be fixed by signing in with the account associated with an MSDN subscription or by using your product key.
But what do you actually get?
A SharePoint installation with March 2013 Public Update installed.
You can add service applications as you like and need, by default ‘Application Discovery and Load Balancer Service Application’ and ‘Security Token Service Application’ are set up.
Summary
In about one hour you are able to set this up and it is really easy to do and for quick development work this will probably be fine.
If you want more control and initially setting up things like the service applications, acccounts, log locations, etc, I recommend using for example the AutoSPInstaller from CodePlex. If you don’t want a stand alone machine you can always set up a virtual network, AD, SQL and a separate SharePoint VM, also in Azure.


Hello anita,
Thanks for Sharing this article for set up a SharePoint 2013 development environment in just one hour.